Howdy! I had recently posted about some Raspberry Pi based systems that can be used in the shack or in the field and those posts received a lot of questions about how they were set up. This post is the first in a series that seeks to explain the design, operation, and setup of these hosts. Some of the work I did here was inspired by Julian, OH8STN’s general off grid/grid down operating philosophy and K1CHN’s blog posts.

So, what are we talking about here?
- A Raspberry Pi Zero W / Raspbian based Pat Winlink host.
- Designed to work with packet on UHF/VHF radios.
- Compatible with a wide range of radios.
- Runs on USB or 12v and has typical 45A Anderson PowerPole connectors in a “right hand red” configuration when running on 12v. This matches my off grid power setup and the ARES + RACES standards.
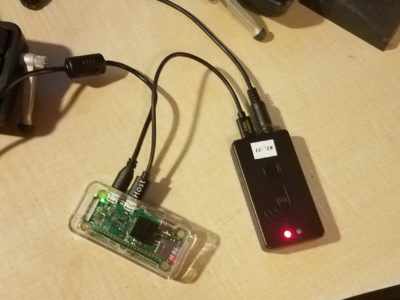
- Uses a Mobilinkd TNC3 to work with a variety of UHF/VHF radios and to offload signal processing to a TNC. That means we don’t need as much processing power on the compute node. Multiple adapter cables are sold on the Mobilinkd store and you can make your own.
- Automatically sets up and tears down the AX.25 port and connection based on the status of the TNC’s USB connection.
- Nice, tidy web interface that can be used by any device with wifi capabilities and a fairly modern browser to send and receive e-mail.
Parts list:
- Raspberry Pi Zero W and power supply
- MicroSD card
- Optional Pi Zero W case
- Mobilinkd TNC3
- Appropriate cable, purchased or constructed to connect from the TRRS jack on the TNC3 to your UHF/VHF radio
- MicroUSB OTG cable for the Pi to TNC3 connection.
- Optional USBBuddy (12v to 5v USB down converter)
- Optionally short USB A to MicroUSB cable to cut down on voltage drop.
- UHF/VHF radio of choice. This setup has been tested with a Baofeng UV-5R, Yaesu FT-857D, Yaesu FT-3DR, Kenwood TM-D710G, and a Kenwood TM-V71 but should work with many others. The Mobilinkd TNC3 was designed to work with a broad range of radios.
Theory of operation:
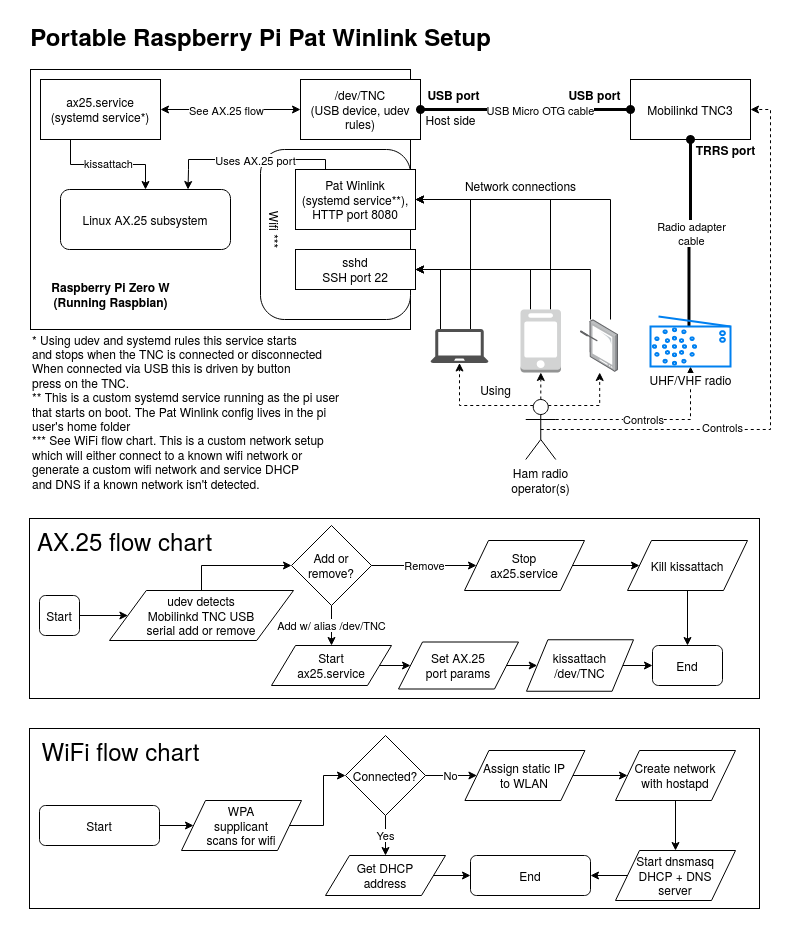
The Pi leverages a number of smaller subsystems to provide e-mail access.
- Scripts and applications that provide AX.25 setup and teardown as the TNC is connected or disconnected. These scripts leverage udev and systemd to detect state changes on the TNC. While you can use Bluetooth to maintain these connections it’s easier and more simple to control connections to the TNC using its USB connection status.
- A set of scripts, services, and utilities that automatically provide a functional wireless network in the event the Pi is unable to connect to a known network. This includes DNS and DHCP.
- Pat Winlink is run as a systemd service so the operator doesn’t have to worry about starting and stopping the service. It can run in the background whether or not the TNC is connected, but it can’t send or recieve e-mail without the TNC connected.
- Pat Winlink is accessed via a web interface. You need a phone, tablet, or computer that can connect to the wireless network generated by the Pi, or is on the same network as the Winlink server. This allows an operator to use Winlink.
Setup process
Start by installing Raspbian on your MicroSD card and getting your Raspberry Pi up and running. The steps here should work. Make sure you give your pi a hostname like “winlink” or whatever you’d like. If you configure dnsmasq this becomes important. Once your Pi is up and running with an Internet connection we can pre-install needed utilities and software so we don’t have to do it later. We’ll also make sure dnsmasq and hostapd don’t start automatically (more on this later). These commands can be done from the Raspberry Pi’s terminal application or from an SSH session if you’ve enabled it:
sudo apt-get update -y && sudo apt-get upgrade -y
sudo apt-get install libax25 libax25-dev ax25-apps ax25-tools dnsmasq hostapd git
sudo systemctl disable hostapd
sudo systemctl disable dnsmasq
Once we have all that installed we’ll install and configure Pat Winlink. Download the latest Pat Winlink release from GitHub. You’ll want to make sure you choose the armhf (Raspberry Pi) .deb file. Make sure you note the name of the file as it will be important when running the install command. When you’re ready to upgrade Pat Winlink in the future you can download the newest version of the .deb file from the same page. Assuming you’ve downloaded the file to the Downloads folder you can run the following command to install Pat Winlink, replacing “pat_0.10.0_linux_armhf.deb” with whatever file name you downloaded:
sudo dpkg -i ~/Downloads/pat_0.10.0_linux_armhf.deb
mkdir ~/.wl2k
After we configure our AX.25 settings we can come back to configuring Pat Winlink as we’ll need some values from that setup.
Next we’ll edit /etc/ax25/axports. This file configures our AX.25 ports that get used to build connections to packet Winlink gateways. Mine looks like this. You’ll of course want to replace my callsign with yours. The port we configure below will be called wl2k. This will be needed for the Winlink configuration in a number of spots.
# /etc/ax25/axports
#
# The format of this file is:
#
# name callsign speed paclen window description
#
wl2k K7JLX 9600 255 7 Winlink (9600)
In the next step we’ll create three files – a script that manages AX.25 port connections, a systemd service that manages the AX.25 port, and finally a udev rule that starts and stops that systemd service when the Mobilinkd TNC3 shows up as a USB serial device or is disconnected.
First, let’s install ax25-up, a script in the Winlink project that manages AX.25 connections. Our systemd unit depends on it. The commands in this step come from here, but are slightly modified to put the script in a different location on the Pi.
bin="/usr/sbin/ax25-up"
sudo curl -o $bin https://raw.githubusercontent.com/la5nta/pat/master/share/bin/axup
sudo chmod +x $bin
Next we’ll add the udev rules that work with systemd to start and stop the service. Add the following contents to /etc/udev/rules.d/99-hamradio.rules:
# Mobilinkd TNC3
ACTION=="add", ATTRS{idVendor}=="0483", ATTRS{idProduct}=="5740", ATTRS{manufacturer}=="Mobilinkd LLC", SYMLINK+="ttyTNC", TAG+="systemd", ENV{SYSTEMD_WANTS}="ax25.service"
ACTION=="remove", SUBSYSTEM=="usb", ENV{PRODUCT}=="483/5740/200", TAG+="systemd"
We’ll now create our systemd unit file which should be: /usr/lib/systemd/system/ax25.service Note the ExecStart command where we use our wl2k port, and /dev/ttyTNC as created by our udev rules. That device is created in the event we attach another USB serial device to create a predictable name no matter what the proper udev name of the device is.
[Unit]
Description=AX.25 KISS interface
Before=network.target
Wants=network.target
BindsTo=dev-ttyTNC.device
After=dev-ttyTNC.device
[Service]
Type=oneshot
RemainAfterExit=yes
ExecStart=/usr/sbin/ax25-up /dev/ttyTNC wl2k 9600
ExecStop=killall kissattach
KillMode=none
[Install]
WantedBy=multi-user.target
Configuring and setting Pat Winlink up as a service
First we’re going to put in a configuration for Pat Winlink. We’ll do that by editing ~/.wl2k/config.json. You’ll want to replace the values I have in my configuration with your own. I’m connecting to a station called W7LT-10 most of the time. You’ll also want to remove your password until you’ve set one. Follow these instructions for that process. Replace your callsign and grid square locator with your own. You may also want to add your own connect_alias entries. These can be various Winlink stations you want to “bookmark” for quick connection. I’ve added a number of them for use while I’m out camping. In that list you might have noticed the one beginning with “!W7LT-10”. Since I use that one most commonly I added an ! to the front of the name to keep it at the very top of the list when it’s alphabetized by the Pat Winlink application. The http_addr directive tells Pat Winlink to listen on any address on port 8080. This will be important when constructing the URL to access Pat Winlink with. You may also notice that I’ve configured this to listen on ax.25 and telnet. This allows the Pat Winlink application to listen in peer-to-peer mode for incoming connections. You don’t have to switch between peer-to-peer and CMS mode manually like you would using Winlink Express. You may want to assign a new telnet password if you want to keep the listen entry for telnet.
{
  "mycall": "K7JLX",
  "secure_login_password": "VerySecret",
  "http_addr": "0.0.0.0:8080",
  "listen": ["ax25", "telnet"],
  "locator": "CN85qm",
  "motd": ["K7JLX Pat Winlink stn"],
  "connect_aliases": {
    "!W7LT-10, 144.910MHz, PDX": "ax25:///W7LT-10?freq=144910",
    "K7HWY-11, 145.030MHz, La Pine, OR": "ax25:///K7HWY-11?freq=145030",
    "KB7EOC-10, 144.950, Tillamook, OR": "ax25:///KB7EOC-10?freq=144950",
    "KG7AV-10, 145.030MHz, Bend, OR": "ax25:///KG7AV-10?freq=145030",
    "W7EUG-10, 145.030MHz, Eugene, OR": "ax25:///W7EUG-10?freq=145030",
    "W7GC-11, 144.950, Hebo Lake, OR": "ax25:///W7GC-11?freq=144950",
    "WC7EOC-10, 144.980MHz, Hillboro, OR": "ax25:///WC7EOC-10?freq=144980",
    "WW7CH-10, 145.050MHz, Eatonville, WA": "ax25://WW7CH-10?freq=145050",
    "N7GWK-10, 145.630MHz, Centrailia, WA": "ax25://N7GWK-10?freq=145630",
    "N7DEM-10, 144.920MHz, Longview, WA": "ax25://N7DEM-10?freq=144920",
    "W7BO-10, 144.920MHz, Woodland, WA": "ax25://W7BO-10?freq=144920",
    "KA7CTT-10, 144.920MHz, Vancouver, WA": "ax25://KA7CTT-10?freq=144920",
    "W6TQF-10, 145.055MHz, Underwood, WA": "ax25://W6TQF-10?freq=145055",
    "N7YRC-10, 144.930MHz, Yakima, WA": "ax25://N7YRC-10?freq=144930"
  },
  "ax25": {
    "port": "wl2k"
  },
  "telnet": {
    "listen_addr": ":8774",
    "password": "AlsoVerySecret"
  }
}
Now that we have a solid initial configuration let’s set Pat Winlink up as a service that starts automatically when the Pi boots. The first step is creating a new systemd unit at /lib/systemd/system/pat.service which will run as the standard pi user that ships with Raspbian. The contents of that systemd service are as follows:
[Unit]
Description=Pat Winlink HTTP server
After=ax25.service
[Service]
Type=simple
ExecStart=/usr/bin/pat http
User=pi
Group=pi
[Install]
WantedBy=default.target
Now we start and enable the service by running some commands in the terminal. The last command should show Pat up and running with a green “active” status. You can press “q” to quit the status display.
sudo systemctl enable pat
sudo systemctl start pat
sudo systemctl status pat
To test all the work we’ve done thus far reboot your Raspberry Pi using the GUI or by issuing the following command in the terminal:
sudo shutdown -r nowOnce your Pi is back up and you’re logged back in as the pi user we’ll connect the Mobilinkd TNC3 to the Pi using the MicroUSB OTG cable. The host side connects to the Pi’s USB port, not the power port. After plugging the cable in press the connect button on the Mobilind TNC3. You’ll see a yellow flash on the TNC’s status LED. This momentary button press should trigger the ax.25 systemd service to start. We can check on that by running the following command:
sudo systemctl status ax25If you see that the service is active and green you’re good to go on the base Winlink functionality. The only thing left to do is connect to it. Use your browser connect access Winlink with a URL derived from this template: http://<your winlink hostname or IP>:8080
If you want an automatic hotspot proceed to the next step.
Automatic hotspot
For this part of the guide just follow the steps that Raspberry Connect lists. You can modify their scripts to create IP addresses and wireless network names/passwords as needed. You can modify the /usr/bin/autohotspotN script and set the IP address there. In the createAdhocNetwork() function modify the ip a add line with the desired IP and subnet mask.
After the scripts scripts have been run and things have been configured you can optionally set up DNS records in dnsmasq. My configuration looks like this but yours will certainly vary. The static IP addresses and DNS records help Android devices or other systems that don’t work well with MDNS find your winlink service. You can use any network you want. The dhcp-host line for winlink.local is commented out because the host we’re running won’t get a DHCP address from itself. The additional entries help other Raspberry Pis or other devices get static IPs and allow them to be found by hosts. In this way we can make sure any devices that connect to your network that offer services show up. Make sure the ‘address’ line matches the hostname of your pi, and that the IP matches the one you set after the RaspberyConnect’s script run in the previous steps.
interface=wlan0
no-resolv
bind-interfaces
dhcp-range=192.168.255.20,192.168.255.250,4h
address=/ft857d.local/192.168.255.1
dhcp-host=dc:a6:32:11:11:11,192.168.255.1
address=/winlink.local/192.168.255.2
#dhcp-host=b8:27:eb:22:22:22,192.168.255.2
address=/tx500.local/192.168.255.3
dhcp-host=dc:a6:32:33:33:33,192.168.255.3
Multicast DNS (MDNS)
To help devices that support MDNS automatically discover the winlink service we can add a configuration file to Avahi. To do that create a file at /etc/avahi/services/winlink.service:
<?xml version="1.0" standalone='no'?>
<!DOCTYPE service-group SYSTEM "avahi-service.dtd">
<service-group>
  <name replace-wildcards="yes">Winlink on %h</name>
  <service>
    <type>_http._tcp</type>
    <port>8080</port>
  </service>
</service-group>
Now restart Avahi using the following commands:
sudo systemctl restart avahiAt this point if your pi can’t reach a known wifi network it should start its own. Make sure you test it before you need it to work in a real-life situation.
As a bonus you can create a document server on the Pi to make sure you have information, forms, manuals, etc. when you need them in the field.
Updates to this blog entry:
4 Sep, 2021 – The Pat Winlink configuration section was updated to reflect changes I’ve made since the original draft of this entry.