Car camping for the weekend

So, we decided to go car camping this weekend and naturally I decided I’d bring my QRP rig and HT (handheld transceiver). The goal was to sleep in the back of our car and cook using a propane camp stove while not paying for a camping spot. I also wanted to see how well my QRP setup worked with fewer resources including charging and little space to store the setup and supporting equipment. For this I picked my Superantenna/Chameleon Mil Whip 2.0 kit and Lab599 TX-500 kit. Neither kit includes feed line. Keep that in mind while reading…

A burning camp stove sitting in the back of a vehicle with its hatch back open in the dark. The stove has a pot on one burner with an avacado and knife roll near it. A woman stands to the left with a head lamp helping prepare food.
Cooking after we arrived at our chosen spot.

On a Friday after work we packed the car and left. A couple hours later we made it to our spot on the Oregon coast with some decent moonlight between spurts of rain. We made dinner in a fairly heavy wind out of the back of the car. We could hear the relaxing sound of crashing waves against rocks that we could barely see. After having some dinner we set up the folding mattress in the car and settled in for the night.

Waves on the Pacific ocean are visible beyond a chainlink fence with wooden posts with a gray sky. A bird can be seen flying by and the inside of an out-of-focus and open car door is visible on the left side of the frame. The sky is gray and cloudy.
View waking up from the car

After waking up and getting ready we made some breakfast and coffee on a nearby park table. We had to wait till the rain stopped to make food but I was able to make some coffee in the rain without issue. I was half way through my coffee and food when I realized I didn’t pack any feed line! Fortunately we were close to a town that happened to have a store open that morning which had a box of left over parts labeled “CB Radio Parts”. There was a small RG-58 coax cable with PL-239 ends and thus my problem was solved! I purchased the cable and got underway for our hike.

A radio sitting on top of an ammo can attached by cable to a duplexer and, Raspberry Pi 4 in a case. A small travel router is also attached by power cable to the ammo can. A number of small bags and a backpack are visible in and partially in frame. The ground is a forest floor with branches, sticks, lichens, and leaves on the ground.
Radios set up with a duplexer for VHF and HF operation

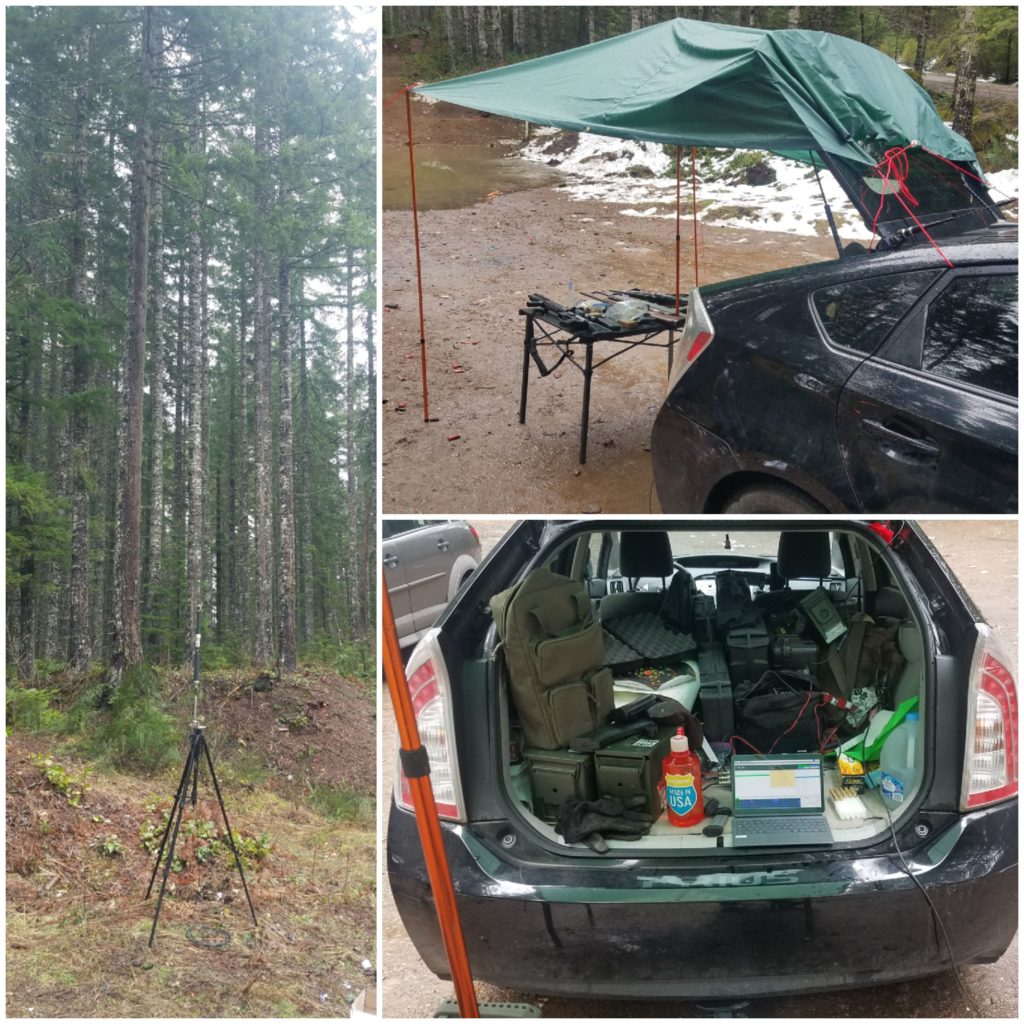
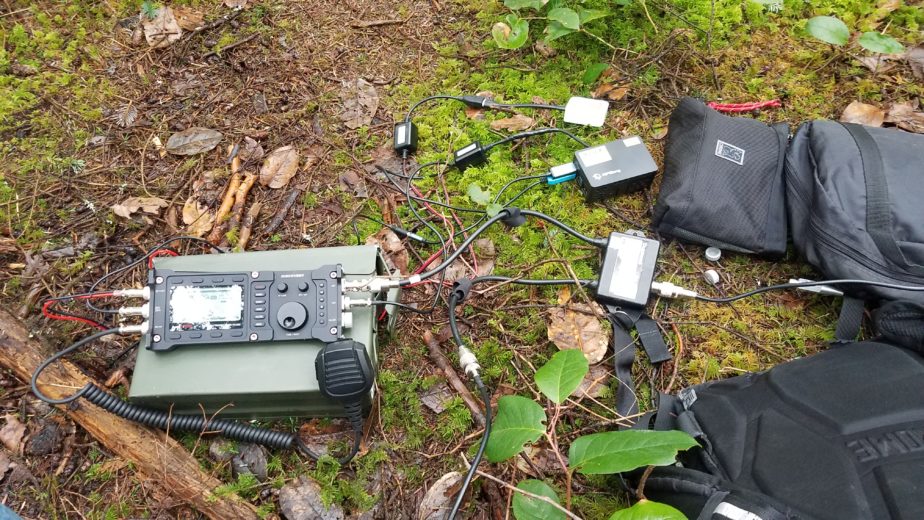
We did a short hike and as we neared the end of the hike we found a small but well worn trail leading off the main path, so we took it in search of a spot where my partner could water color and I could set up and operate. Not too far down the offshoot trail we found a fairly open patch of moss with a fallen tree that I could use as a bench. I set up the Superantenna using the ground spike for simultaneous HF and 2m operation using the Superantenna MC2 and MP1C, topping the loading coils with my Chameleon Mil Whip 2.0 for increased SWR bandwidth over the titanium whip that comes with the Superantenna kit. Unfortunately the photo I took of the deployed antenna was corrupted by the time I got to uploading it. The UHF/VHF side of the Comet CF-706 duplexer was connected to my Yaesu FT3D so I could attempt contacts on the 2m calling frequency (146.520Mhz) and monitor/send 2m APRS packets.

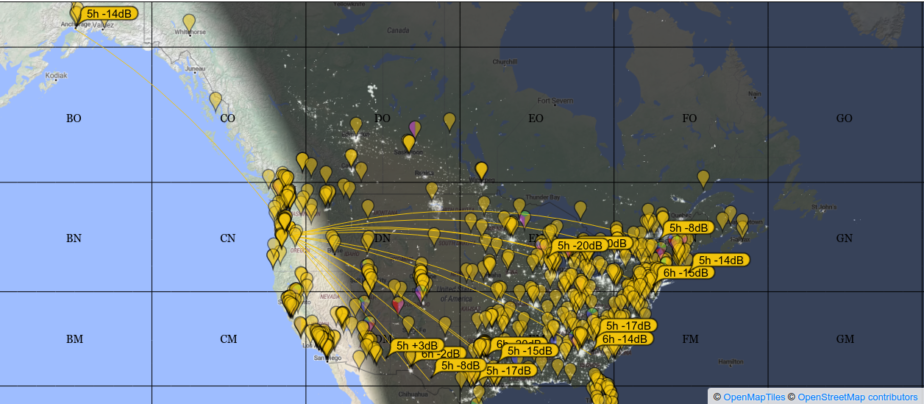
I tuned the antenna using my NanoVNA for 20m and started working SSB phone. I attempted to respond to a number of calls and tried calling to no avail. After 40 minutes of trying between 5 and 8.5W I decided to switch to JS8Call. I have yet to make a phone contact on my Lab599 TX-500 on any band. I’m hoping I can just chalk this up to being run over by higher power stations. As I was setting my station up for digital comms I noticed something unexpected – the maidenhead coordinates in JS8Call hadn’t been updated automatically as js8cli would normally do, and I also noticed the time on the Pi varied by a minute from my cellphone. That’s highly unusual as the GPS unit typically corrects any RTC drift that might occur. The next step was to check my GPS unit’s LED through the vent holes in the case. It’s flashing one second on, and one off. For the specific Adafruit Ultimate GPS board I run that means the GPS hasn’t acquired a lock. I waited a few more minutes and found that it still hadn’t acquired a lock and decided to check the board for any broken or loose connections. Since the entire setup allows me to disassemble it without tools I did to inspect it. I found no loose connections or other apparent issues. It was time to reboot by fully removing power as had worked sometimes in the past. Still no luck following a full power down / power up sequence! I then leveraged my phone and tablet GPS units to get a position. My phone eventually got a location and grid square using the HamGPS application, but my phone had been on and tracking satellites for the entire hike. My Pi and tablet had been off. This is interesting because I had an OK view of the sky despite the very tall trees surrounding the patch. I hoped my GPS unit wasn’t damaged or malfunctioning and decided to manually set my JS8Call location from my phone, automatically acquire a timing offset from other stations in JS8Call and move on. I had a couple stations hear my heartbeats but couldn’t make contact with any operators directly. I also attempted to send an SMS message to a friend but alas no one was hearing my transmissions as the band seemed to have closed. Overall not the best luck, but it was time to head back to the trail head so we had daylight to drive out and make camp.

An open hatch back of a vehicle loaded with bags. There is a Raspberry Pi in a case and travel wireless router attached to a battery in a bag.
Hooking the Raspberry Pi and wireless access point up for testing after the hike
Successful test of the GPS from the car without the trees overhead

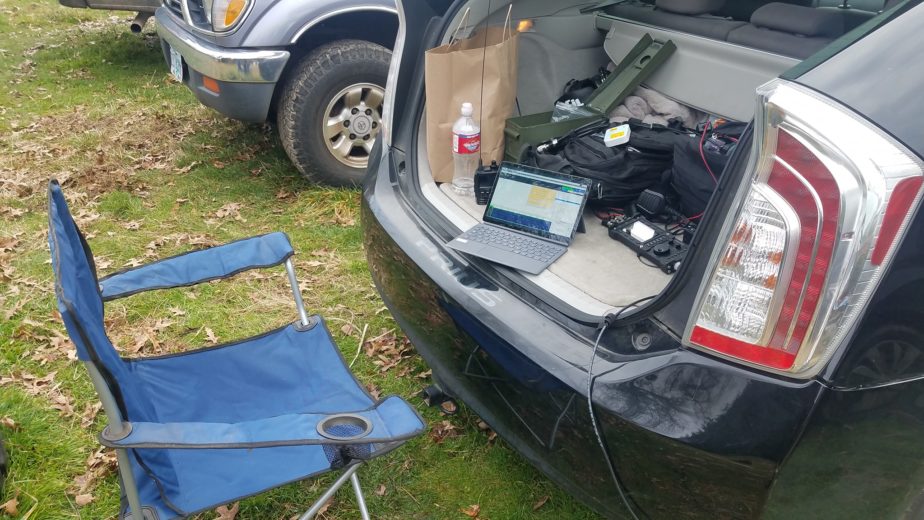
I decided to hook the gear up in the back of the car as my partner got the dog ready to head out in order to determine if my GPS unit was actually broken. I hooked everything up to the big battery that was in the trunk and after a minute or so the GPS lock LED flashed once every several seconds. This indicated a lock, so I fired the tablet up, logged into the Pi, and checked the reports with cgps, a test GPS client provided by the gpsd-clients package. They lined up with where we were. Even though I could see sky clearly through gaps in the canopy the GPS unit wasn’t able to acquire satellites in the time we spent in the clearing.

A soft-sided cooler, LED lantern, water bottle, beverage in a can, and a radio attached to an ammo can by a power cable and a duplexer sitting on top of a wooden park bench.
TX-500 set up for shortwave listening (SWL) and for 2m operation with my Yeasu FT3D

After arriving at camp and rigging the car for sleeping I set the radio up for shortwave listening and got my Yaesu FT3D connected to the duplexer after this photo was taken. It was a windy and chilly but great day. It was time for a beverage and some relaxing SWL and taking in the scenery before turning in for the night. I used the same setup as I did on the hike, except with a tripod for the antenna and no radials since I was receiving only. We were able to hear a number of stations, but settled on Radio Havana English (6.0MHz if I recall correctly) since they were playing music instead of the typical religious content with creepy-sounding voices you typically hear on US shortwave stations like WRMI in this part of the US.

An antenna is mounted on a tripod in the foreground. Directly behind it is a park bench with someone sitting on it and some radio equipment with a cooler. The background is a fenced-in green area and the Pacific ocean and steep rocks in the background.
View of the setup on the park bench

Lessons learned:
– Don’t forget your feed line. I got lucky enough that I could acquire some, but if this was a disaster or if I were on a hike/camping in a remote location I would have been unable to operate.
– Even though you can see a lot of sky in an area, it doesn’t mean your GPS can acquire satellites. Be prepared with some mechanism to acquire and set your location and time for something like JS8Call.
– When documenting something take a couple pictures in case one of them gets corrupted.

Sunday funday in the Tilamook State Forest

This is just a quick post about some light operating I did out in the forest today while getting some target practice in since I’m not really a sports person. The weather was fairly cold, between 35 and 40 degrees F with alternating rain and snow. This post is mostly about what running QRP in decent conditions can do. I set my Lab599 TX-500 up with my Superantenna / Chameleon Mil Whip 2.0 antenna combo and my offgrid Raspberry Pi and access point this morning to see how far I got out from the outdoor “range” we were at. I powered the whole setup with my Bioenno 40Ah LiFePO4 battery and threw my GoalZero Nomad 20 folding solar panel on just to take some of the load from the battery as it’s just a standard practice I engage in.

Map showing connections from my station to others in the continental US and AK.
Screenshot of my signal reports from https://pskreporter.info
Map showing distance between my station in OR and an east coast US station.
Map showing distance between my station and KC1GTU. Generated by https://www.karhukoti.com/Maidenhead-Grid-Square-Locator

The idea was that I was going to try to run JS8Call at QRP on 20m for a few hours. The power levels I ran were 1w, 5w, and 7.5w (for a couple minutes) throughout the day. I generally settled on 5w as I was heard from the southwest, south, along the east coast, midwest, and AK. Bumping the power to 7.5w didn’t really yield any additional responses to my heartbeats so I reduced power to 5w and stayed there for most of the day. My furthest contact via heartbeat and “QTH?” commands was KC1GTU at FN41 (about 2,250NM away at 5w).

Setup photos:

Collage of photos showing my antenna on the left. On the top right is a table covered by a tarp extended from the open hatch back of a Prius to two poles covering a table with a center support extended up from the table top. Various firearms are sitting on the table. On the bottom right is a view inside the open back of the vehicle with disorganized cases, and a radio setup with a tablet.
Very messy setup

Lessons learned:

  • Make sure you set your grid locator correctly in JS8Call. Anyone seeing my station would see me at CN85qm, about 45 miles away from where I really was at CN85hs. (Update: JS8CLI solves this problem.)
  • I could probably run this setup for a whole day on my 12Ah Bioenno LiFePO4 battery.
  • The Lab599 TX-500 continues to prove itself to be a great rig off grid!
  • Don’t bring too much gear even if you’re in a car.
  • The gear performed well below 40F.

Raspberry Pi document server

When operating in a grid down or off-grid scenario it is often important to have access to information, maps, manuals, forms, frequency plans, emergency plans, etc. This guide seeks to explain how to install and populate the document server with info.

First, using either SSH or the terminal application on your Pi install git.

sudo apt-get install git

Next, read the documentation for document-server. This will tell you how to install it and its dependencies.

Once installed you can copy any required documents to the pi user’s Documents folder. I strongly recommend you use PDF and text formats, and images rather than word documents or other formats that require more specialized applications to open. When you load the page using the Raspberry Pi’s hostname or IP address via http://<IP or hostname>. You’ll be presented with your documents! They can now be opened from any device that has a web browser and can open the files you stored.

As extra credit I also create a zip file with all my documents so you can download all the documents at once if need be. This can be useful when you want a copy of all documents so you don’t need the Pi to be powered on in order to read information.

Optional Avahi configuration

In order to advertise services to devices that support MDNS you can add the following configuration to /etc/avahi/services/documents.service and then restart Avahi: sudo systemctl restart avahi-daemon

<?xml version="1.0" standalone='no'?><!--*-nxml-*-->
<!DOCTYPE service-group SYSTEM "avahi-service.dtd">
<service-group>
  <name replace-wildcards="yes">%h Documents</name>
  <service>
    <type>_http._tcp</type>
    <port>80</port>
  </service>
</service-group>

Thinking about off grid / grid down networking and ham radio

Hello all, I wanted to talk a bit about the subject of off grid networking and digital ham radio communications that leverage modern technologies that we use and rely on every day. I’ve been doing a number of experiments that leverage Raspberry Pis, phones, tablets, and laptops in the shack, in the field, and while traveling to operate one or more ham radios.

I’ll go through the ways I’ve configured my field computers to operate in: as a single device, as two or more devices, as devices connected to a $25 travel router running OpenWrt, and as equipment connected to a home network. The reality of this setup is that all my off grid computers work in one of two ways given any situation, but with some subtle differences.

The broad scenario 1 is when one of my Pis detect a wireless network they’re configured to connect to. This can mean they’re connected to a familiar Internet-connected wifi network at the QTH or elsewhere as a client, OR they’ve connected as a client to a wifi network generated in the field by another device designed to operate off grid. This means the device is acting as a standard wifi client.

The second broad scenario that one of my Pis supports is that it does not detect a recognized wireless network and generates its own. Only one device should be in this mode in any scenario. Once a single device generates a network any additional Pis, laptops, tablets, phones, etc. should connect to this Pi which will also automatically serve DHCP, DNS, NTP (in some cases), etc. This host then becomes responsible for handling basic network services as well as its ham radio related functions. There is, however, a drawback to this scenario with my current setup. For some reason my Raspberry Pi 4s and Raspberry Pi Zero W will stop passing network traffic after a few minutes. The solution to this problem is just to re-connect to the wireless network and things work again, but reliability is an issue. If you can’t simply log in and reconnect a Pi you have to reboot it. I address my solution in one of the more specific scenarios discussed later.

By supporting these two broad ways of handling connectivity we can create effective on and off grid networks. This makes sense because the first host that gets powered up has the chance of becoming the master of the wireless network. By coordinating the name of your off grid or standalone wireless network and its pre-shared keys you can create a network that can be formed on the fly, and that can have at least some self-healing properties in the event of a device failure. If all the nodes are capable of becoming an access point with all necessary network services in the absence of another we can ensure our services are available, or are as available as possible.

Let’s start with the five very specific scenarios we mentioned earlier. Notice that these five scenarios are mostly combinations of the two very broad ways our devices are configured to behave.

First let’s say that things are normal and we’re doing some digital HF or UHF/VHF work in the shack. Our local infrastructure is working fine, our Internet connectivity is fast and working well. Because all of our devices are clients on our home network we can use any device to access VNC, SSH, HTTP, or Winlink services on our Pis without issue while watching our favorite streaming service. All the Pis we have powered up are clients to an established network.

Secondly let’s talk about a scenario where we’re on battery but no configured wireless networks are available. Maybe we’re in an emergency scenario, camping, or on the road. Our Pi attached to our radio generates a new wireless network that you can connect to and starts the necessary DNS, DHCP, or even NTP service to allow wireless clients to connect and use provided services. Maybe this Pi is running JS8Call/FlDigi or Pat Winlink. You just connect your phone, tablet, or laptop to this network and access the documentation web server, Winlink web page, or use VNC/SSH to control the Pi. We’re now able to communicate using our radio via digital modes and read any documentation we stored on the Pi. It should be pointed out that none of my field-portable Pis have keyboards, displays, or monitors of any kind when in normal use. I rely on other devices for those functions to cut down on power consumption and bulk.

Our third scenario assumes one operator with no configured wireless networks, but is running two radios. Maybe we have one Raspberry Pi attached to a UHF/VHF radio that’s set up for packet Winlink, and another HF rig running JS8Call. The Raspberry Pi that booted first is serving our wireless network and basic network infrastructure services that allow subsequent devices to connect. The operator is now able to connect to to the generated wireless network and use Pat Winlink as well as JS8Call or FLDigi. One person and one device can now manage two radios set up for different purposes! The trick is that we might not have 100% due to the connection issues with Pis when they’re in access point mode.

For our fourth scenario we’ll modify the last scenario a bit. We have one operator with one device connecting to two radios over the wifi connection. This time we’ll introduce our modified $25 wireless access point. It’s now generating the wireless network, serving DHCP, DNS, and NTP if one of our Pis with GPS units is connected. All Raspberry Pis are now in wifi client mode so we no longer have the connection reliability issues in our second and third scenarios! What’s even better is that if we have a wired Internet connection we can now plug that into the travel router and have full Internet connectivity for our Pis and operator’s device. Sweet!

Our fifth scenario builds on the fourth, but we’ll introduce one or more operators using one or more devices. This could also apply to the third scenario with a Pi hosting the wireless infrastructure without an access point but we’ll ignore that. Every radio operator connected to the wireless network can now queue up e-mail on Winlink or take turns using VNC to control our HF rig. All the operators on the network now have access to the documentation server because it’s just a web page that serves files. We now have a field network that can serve more than one radio operator, and we can be more efficient sending email over Winlink by batching, and we can also decide to create an APRS server that allows multiple instances of APRSDroid or some other KISS over TCP client to connect if we’d like.

I hope you came away from this thinking about different ways we can build resilient and flexible systems even when working off grid or in emergency situations. A minimal amount of additional hardware combined with some preparation ahead of time can allow us to use more efficient or sometimes required digital technologies off grid and can even allow a group of operators to save power by sharing radios and batching messages rather than dealing with the overhead of connection setup for modes like Winlink!

A random field day (Jan 16, 2021)

I had the opportunity to spend a few hours in the Oregon countryside while my partner had a meeting. Naturally I decided to do deploy my new radio, the Lab599 Discovery TX-500 along with my second purpose-built digital comms Raspberry Pi. The other is used with my Yaesu FT-857D.

Picture of radio equipment in the back of a Prius along with a folding chair facing the hatch back.

I began by setting my rig up in the trunk of my car. Since I wanted to at least simulate running off grid on battery I didn’t connect my radio to the car and opted to use my 40Ah Bioenno LiFePO4 battery. I had intended to bring my smaller 12Ah Bioenno LiFePO4 battery which was actually purchased for the TX-500 kit, but I had spaced it and left it on the charger. Despite the cloudy weather that is typical of Oregon this time of year I also brought my GoalZero Nomad 20 to see if I could extend my runtime even if slightly and to give it a good test. Every little bit of extra juice helps, but I only used 1.8Ah of battery the entire 5.5hr deployment! The solar panel did provide an additional 0.8Ah which is 44% of what the battery provided.

Folding solar panel placed on top of the car roof with cable running to hatch back.

Solar panel on the car and facing south

Buddipole power mini lashed to a 40ah LiFePo4 battery
Buddipole Power Mini and 40Ah Bioenno LiFePo4 battery.

The first antenna I deployed and ran was my Superantenna kit, but instead of using the titanium whip supplied with the kit I added the Chameleon Mil Whip 2.0 to get more efficiency and significantly wider SWR bandwidth. I tuned the antenna up for 20m using my NanoVNA and ran JS8Call on the TX-500’s dedicated Raspberry Pi… using my tablet as a keyboard and screen over VNC. I had a number of successful contacts from the Southwest to AK and managed to relay a text message to a friend in NM via an operator in-state running 9w!

Superantenna deployed on a tripod topped with a Chameleon Mil Whip 2.0.
Superantenna w/ tripod and Chameleon Mil Whip 2.0

I did try to make some SSB phone contacts but there was a contest going so I didn’t really get too far. As the sun started going down I noticed the 20m band was starting to close, so I tuned to 40m and the contest was still going on so I wasn’t able to make any contacts. It can be difficult to raise anyone during a contest because a lot of folks are talking and running high power so it’s very easy to be drowned out.

In general I also like to try more than one antenna or antenna configuration per deployment so I set up my Chameleon EMCOMM Portable III in an inverted “V” configuration with the center point hung using an arborists’s weight and some paracord in a tree. I was able to make some JS8Call contacts and was able to hear a lot of distant operators. Again, I was unable to make a contact using SSB phone despite the fact that the tuned inverted V configuration should technically be more efficient than a loaded vertical. I’ll need to do another test on another day.